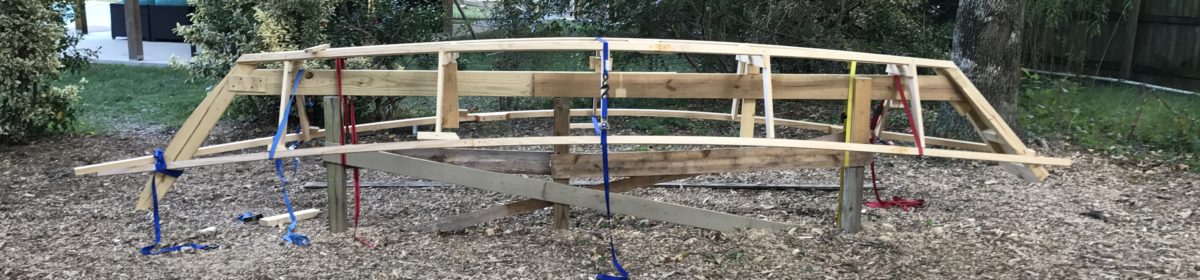
Since we knew we were going to enclose the forward and aft ends of the boat into lockers, we had to figure out a way to seal off the top of each. We thought about creating a framework of supports over which we could lay more plywood. It was tough to bend the plywood in multiple directions, however, so we decided to try and strip plank method instead. We had a few lengths of small pieces of 3/8″ trim that we used to bend across the top of the dory and we used clamps to hold them in place. Following the natural bend of the wood, we ended up creating a nice curve to the decking, which we ended up calling the turtledecks.
Instead of cutting a framework to put plywood over later, we decided to just glue the pieces in place. It seemed sturdy enough, and with a good layer of fiberglass and epoxy over the top, we figured it would be strong enough to bear a small load should it need to and it would certainly keep the water out!
So we started the turtledecks by simply bending the 3/8” by 1” pieces of wood across the bow and stern, one by one, and epoxying them in place. Before we got started, however, we epoxied in place a structural member across the front and back frame to serve as the backstop for the turtledecks. Once this member was in place and epoxied, we began epoxying the3/8”x 1” pieces in place.

We let the natural bend of the wood define the shape of the turtledecks, rather than bending the wood around some type of framework.

Both large and small clamps helped hold everything in place. We could apply a few strips at a time and worked slowly.
This is as far as we made it before the dory had to be put away for the frigid upstate New York winter. When we uncovered the boat after many months in the cold, several of the strips we applied the previous fall came apart after the force of them being bent overcame the adhesive force of the epoxy. Unfortunately, we did not get any pictures of the failures before we decided a change in the construction of the turtledecks was needed. Instead of trying to fix the few strips that we had applied, we recognized that the strips were probably too thick to easily make the bend across the bow and stern of the boat, so we ripped them up and started over.
The previous strips were 3/8″ and too thick, so we decided to put down two layers of 1/4″ strips to complete the bow and stern turtledecks. We also added in a support member down the centerline of the turtledecks, both forward and aft, to give the strips a consistent resting point so they all followed the same general curve as we added them on. You can see this support member below on the aft turtledeck.

The thinner strips were much easier to bend and apply. We applied them carefully, a few at a time, until the general shape and formation of the turtledecks emerged.


After the first layer of strips were applied, we started adding the second layer. We mixed thickened epoxy and ensured we had good coverage before securing the second layer of strips in place.


It was tricky shaping the strips as the turtledeck neared the transom. We were concerned that if we carved away too much of the strip in order to follow the contour of the transom that rose above the turtledeck, then the strip would break when we bent it to shape. We took our time and successfully shaped the strips to fit the transom. Thickened epoxy filled the voids created by our poor craftsmanship.


After we completed the aft turtledeck, we used the same technique of applying 1/4″ strips to the bow section of the boat. The geometry of the bow made bending the strips more difficult. We found that we needed to keep the strips much longer than the actual bow section so the bent easier. Then, once the epoxy had dried, we cut off either end. We applied to layers of strips, just like we did on the aft section.

You can see in the picture above that at the bow stem we were not able to bend the strips at all. Instead, we cut small straight sections of the strips and epoxied them in place. We figured that some liberal use of thickened epoxy and sandpaper would allow us to fair the area around the bow stem once everything was in place.


Once we finished installing all of the strips on the fore and aft turtledeck areas, we let all of the epoxy fully cure for about a week. We wanted to make sure it reached full strength before we decided to attack these areas with saws and sanders!
With the epoxy cured, we first used hand saws and an oscillating saw to cut away the big pieces of the strips that overhang the gunnels and rub rail areas.


Once the big pieces and jagged edges were taken care of with the saws, it was time to work some magic with the sander. Using a belt sander and an oscillating sander with 80 grit paper, we slowly shaped the turtledecks into the smooth areas we knew they would become. It took several sanding sessions, but we ultimately got the areas looking smooth and ready for fiber glassing. We highly recommend that you wear a quality respirator, as we did, when sanding this much of an area. We forgot to take a picture, but the amount of wood and epoxy dust covering everything was insane. We’d hate to have that dust in our lungs and don’t recommend you ever breath it in!


With the turtledecks completed, it was time to fiberglass the topsides. This included the turtledecks and the rub rails. Once the fiberglassing is complete, the boat will be ready to paint!