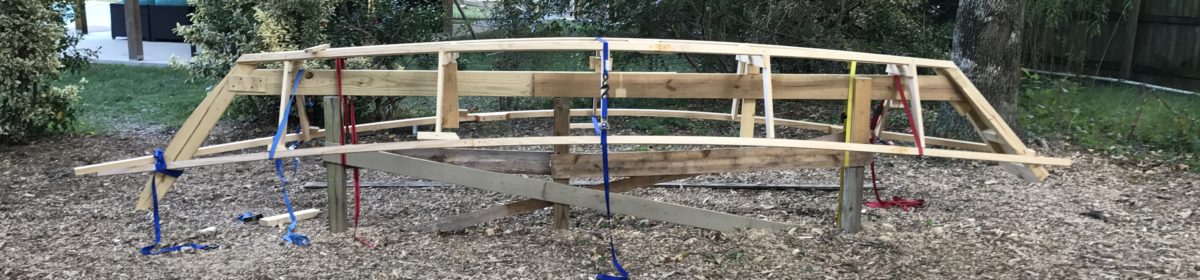
With the frames of the boat set up on the strongback and equally spaced, they must be linked together with structural supports that not only hold the entirety of the boat together, but also provide connection points in order to attach the sides and bottom of the boat. These structural supports are called the chine log and the sheer clamp.
The boat’s chine is the lengthwise break in the shape of a hull that distinguishes it from a round-bottomed boat. A chine log is the structural support that runs along this length at the bottom corner of each frame on the port and starboard sides. The sheer is similar; it is the lengthwise break in the shape of the hull that separates the sides of the boat from the deck. A proper name for this structural piece or “stringer” is the sheer clamp and it’s the piece that runs parallel to the chine and connects the upper corner of each frame down the length of the boat.
The installation of the chine log and the sheer clamp require each frame to be notched to accept them. We found this to be the hardest part of the build so far. Bending a straight piece of wood in multiple dimensions creates complicated angles that must be accounted for in each notch so that the chine log and sheer clamp fit properly.

In order to determine how each notch should be cut, we used ratchet straps to hold the chine log and sheer clamp in place so that we could visualize how each piece interacted with each frame. This was an iterative process, especially as we actually started cutting notches into the frames. As one notch was cut in a particular frame, the way the chine log or sheer camp would sit at a different frame would change slightly. These changes had to be taken into consideration as we progressed.

We used an oscillating saw with a wood blade to make the notches in the frames. With the chine log or sheer clamp in place, the frame was marked appropriately to outline where the cuts were needed. The oscillating saw was easy to use and made precise cuts that were forgiving enough to be changed when we needed to. As long as we didn’t cut away too much material, we were able to use rough measurements and our eyeballs to get close enough on each notch to properly receive the chine log and sheer clamp. Thickened epoxy helped fill in where we cut too much.

Once the notches were cut, we used screws and epoxy to attach the chine log and sheer clamps to the frames. Straps were used to help coerce everything into place and hold together until the epoxy set.

Once installed, the chine and sheer really brought the boat together. Other than installing the sides and the bottom, it was easy to see how the boat would look in the end and verify that our frame construction and spacing was accurate. The fairness of each curve let us know that we had done a good job and that it would be easier for us to install the sides and bottom of the boat than if we had to cover up imperfections at the same time.

We trimmed up the extra lengths of the chine log and sheer clamp and made the boat ready for the next step – installing the sides and the bottom!
