Until a boat is far enough along in a build to hold itself together, a separate support structure must be erected to hold its framework together so fasteners and glue (or epoxy) can be applied. This structure, or the backbone of the build (at least until you have all structural members in place) is called the strongback.
We decided to build our strongback directly in our backyard using pieces of scrap lumber we had available from other projects.
Taking the boat’s dimensions into perspective, we chose a spot that was big enough and clear of obstacles so we had plenty of room to maneuver around the boat as we built it. We also ensured we were close enough to an electrical outlet so we could power our tools that we knew we’d use throughout the build.
Our boat plans came with prints that depicted how to construct the strongback. Key lengths, heights, offsets, and angles were pulled from the plans and transposed into a workable strongback built mainly from dimensional lumber laying around our garage.
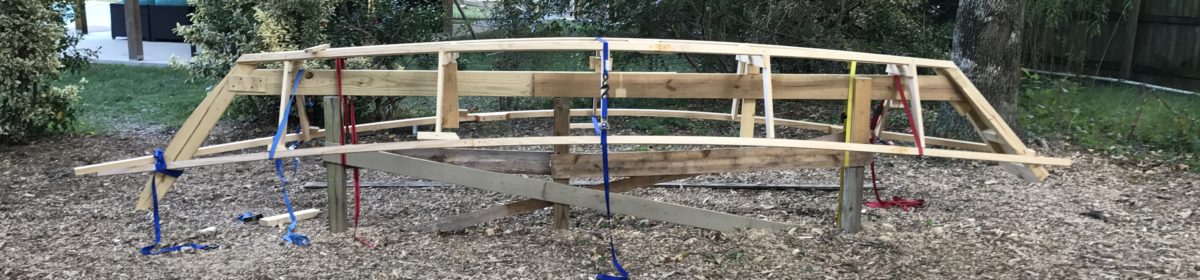
A strongback must be firmly rigid so that your boat framework doesn’t move during the build and throw off your proportions that you so carefully measured while lofting. In order to accomplish this, we dug three holes in the ground for three 4×4 posts that would become the foundation of the strongback. We did not end up setting the posts in concrete, but if we were to build another boat, a small bag of concrete would help firmly hold the posts in place. Our strongback held up just fine, but there were a few moments when bending straight pieces of wood onto the frames that the strongback would shift. Luckily, the boat was small enough and the reference measurements were easy to verify, so the boat held its form.

Once the posts were set, we mounted the horizontal portion of the strongback onto the posts. Different blocks were mounted to the strongback to aid in frame placement, as well as to adjust the height of some of the frames in order to develop the boat’s rocker – or the bend in the bottom that defines the dory’s shape.

We also utilized old fence boards and cedar house siding to provide stability in the longitudinal direction so the strongback didn’t move. Lateral stability was provided by the depth of the 4×4 posts in the ground. Again, affixing the posts in concrete would have helped, but it wasn’t necessary for our small build. A larger boat would require more support at the foundation.
Building the strongback did not take long, and it marked the groundbreaking for our build. Once built, we mounted the stem and the transom to the strong back so ensure we had the proper angles for each, and to verify the fore and aft measurements of the boat against the plans.


With the strongback in place and measurements verified, we were ready to get serious. It was time to take our frames and mount them in their proper positions. With the framework in position, we’d be able to start installing the rest of the boat’s structure, to include the chine log, the sheer log, and the plywood sides and bottom.
How do I purchase the full set of plans.
Darrel,
Unfortunately, Jeff Spira passed away some time ago and his website was taken down. As such, his plans are not available for purchase.
Hi Darrel. There is a page on Facebook called Boat Building & Builders which is a group of builders of Jeff Spira’s designs. It has become a repository of plans that are now free for download and most of the designs are there but unfortunately the Nova Scotian Banks Dory has not had any plans uploaded yet.
Hello Kevin, sorry for asking, but it is possible to buy from you a copy for the plans for this dory? I was not able to reach Mr. Spira , the site is archived, i just can see the old Page section but the links are not working. Thnks in advance.